


 Title Index
 Recently Changed
 Page Hierarchy
 Incomplete
 Tags
Tags


The Parent-Child Community relationship explained:
In conference manager, you have a Parent Community (CID). Underneath this Parent, you can create Child Communities. For example, if you have a brand new event planned this year that you haven't run before or haven't run through Conference Manager before. On the rare occasion, you may need to create a Grandchild Community under one of your Events. For example, for your 2015 Conference Event, you require a special community to collect scholarship applications. We advise our Clients to re-use their Child Communities each year, instead of creating a new CID. See diagram below:

Creating a new Child or Grandchild CID
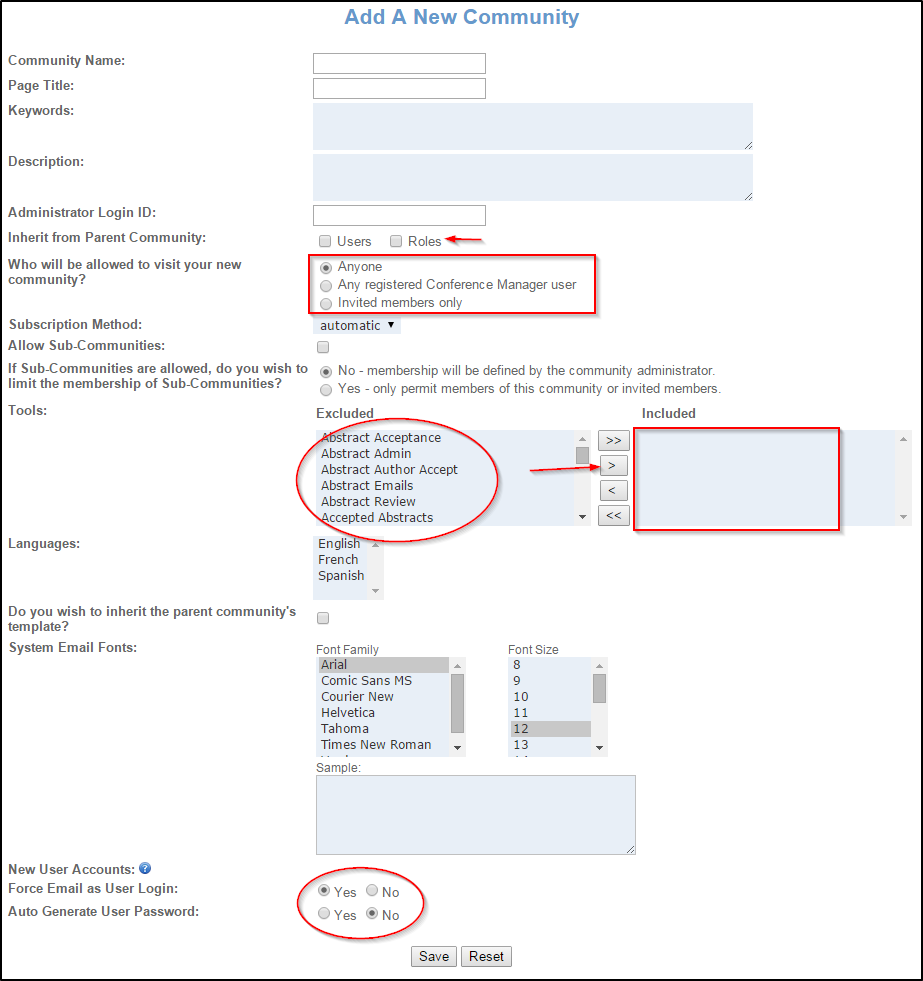
If you need to create a new Child or Grandchild community, you can use the Add a New Community tool. This tool is only available to Administrators. Please keep in mind, that when we run the monthly usage reports, we will add the charges for the additional new community to your monthly invoice. If you have never added a new community before or you have questions about billing for added communities, please contact us at support@confmanager.com to ensure that you set it up according to best practices. After speaking with your Software Support Specialist to confirm that a New community is the best options for your Event, you can continue with the instructions below.
Community Name: Enter the name of your Event.
Page Title: Enter the name you wish to see in the Title Bar of the browser, it can be the same as your Community Name.
Keywords: These are words that can be used by Search Engines to find your Conference Manager pages. If you have an external Event Page of your own, you don't need to fill this area in.
Description: Enter a brief description of this Community if you wish.
Administrator Login: Since you are creating this page, it is likely that you are the Primary Administrator. When creating a new CID, enter the userID of the primary administrator (i.e., yourself). When editing an existing conference, use the pull-down menu to view a list of administrators in the CID to which you may promote to primary.
Inherit from Parent Community: If you wish to bring the User Accounts and Roles from the parent CID, check the boxes. All Users subscribed to the Parent will now be subscribed to this CID. Any Roles you've set up in the Parent, will now be available here as well.
Who can visit your Community?: You have three options for allowing access to your new community:
- Anyone - this means that anyone can see your page even if they don't already have an account. Choose this option if you have many delegates who are new to conferences
- Any registered Conference Manager user - this means that the user must already have a Conference Manager account and must be signed in to access this community
- Invited members only - this means that the user must already have a Conference Manager account, be signed in and be Subscribed to the community by an Administrator
Subscription Method: leave this set to Automatic.
Allow Sub-Communities: leave unchecked
If Sub-Communities are allowed, do you wish to limit membership: leave this set to 'No'
Tools: Select the Tools from the 'Excluded' list on the left and use the > arrow to move it to the 'Included' side. If you want to include all Tools, use the >> button. Keep in mind, that you will be invoiced for any extra tool use that you select beyond what you already have in your Contract.
Languages: Use ctrl+click to select one, two or three of the languages you wish to include for your delegates to choose from. Keep in mind that only the system generated fields will change. Any text that you enter into the forms yourself will need to be translated and included in the blue text box.
Do you wish to inherit the parent community's template: If this Event will share the same styling (logos, fonts, colour scheme) from the 'Parent' community then check this box.
System Email Fonts: If you wish to change the Font Family and font size for the text in your confirmation emails, you may change it here. We recommend leaving it as the default.
Force Email as User Login: If this is a brand new Event and you have always used the Email as the User account name or if you are a new Client, then set this to YES. If you have allowed users to create their own user names in the past, it would be advisable to set this to NO
Auto Generate User Password: We strongly advise you to set this to NO so the user is able to set their own password to something that is meaningful to them that they will remember. If you allow the system to auto-generate passwords the users will be given a random code as their password, that they can can reset at a later date.
Email Domain
We are also in control of what email domain Conference Manager uses for system-generated emails. This is set on a CID by CID basis by adjusting the Sending Domain field from the bottom of the Edit Conference screen. The default value is simply @mg.podiumconferences.com (or @mg.confmanager.com for Conference Manager clients). In order to configure a custom email address we must do a few things:
1. Create a new domain in Mailgun (e.g., @sample.podiumconferences.com) or your email provider.
2. Add the DNS records and verify the domain.
3. Create a route which will redirect emails sent to this domain to the event planner (i.e., although the Reply-To field will appear different than the address entered, the routing will restore normal communication flow).
4. Update the sending domain in the CID (and all associated parent or child CID's).
And that will do it. We now have a client-specific email domain to match their CID, and all email responses will be routed to the correct person. Please contact Conference Manager support (support@confmanager.com) for assistance.