


 Title Index
 Recently Changed
 Page Hierarchy
 Incomplete
 Tags
Tags


Introduction
Note: If you do not see the myEmma Upload tool under the Tools -> Community section of your CID, please contact support@confmanager.com for assistance.
myEmma is a software platform used to coordinate and disseminate e-blast style marketing campaigns. Users may create separate sub-accounts for managing different clients, associations, or projects, and then create and update mailing lists to facilitate the e-blasts. It also provides useful metrics (e.g., total emails sent, open rate, click through rate) to help you increase the efficiency of your communication and marketing operations.
We have created an API linking myEmma to our Conference Manager software. Rather than having to export user data into spreadsheets and manually import them, we can now integrate your community (and all parent and child CID's) directly in to your myEmma account. Simply choose your selection criteria and upload the resulting users and these data will be added directly to one of your myEmma mailing groups. First names, last names, primary affiliations, and email addresses are included in the upload.
Please note that this requires both an active Conference Manager community and myEmma account.
Set-up Instructions - myEmma
Prior to using the tool in Conference Manager we need to set up our account in myEmma (please see their documentation and support for help setting this up). The first thing to do is to go to the 'Manage agency accounts' screen (Menu -> Accounts). You will see here a list of all sub-accounts you have access to. We need to set a primary contact for each sub-account we want to use (otherwise we cannot generate the API key). An unfortunate limitation of the myEmma system is that you cannot use the same email address as primary contact for multiple sub-accounts. A workaround to this is to use a gmail account (e.g., sample@gmail.com), and add '+[account name]' to the end of the name (e.g., sample+[account name]@gmail.com). This is different enough for myEmma to consider it a distinct contact, but gmail ignores anything after (and including) the +, so you can use a single gmail address for multiple accounts. Once this primary contact has been set (an email is sent to the address, which the user then uses to confirm) you can go in to the sub-account and find the API key section.
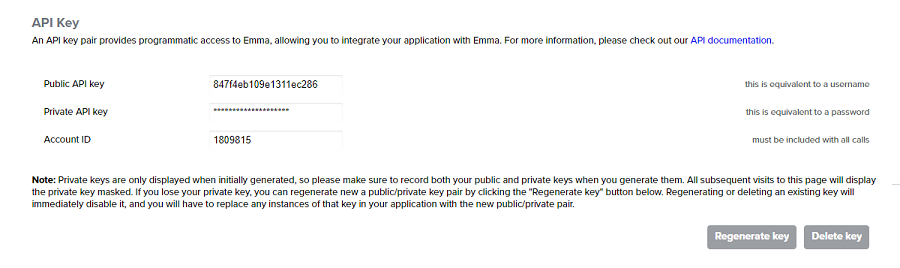 When you first go in to a sub-account, the API Key section will be blank. You must select the 'Generate key' button to get the three necessary pieces of information - WRITE THESE DOWN:
1. The Public API Key
2. The Private API Key
3. The Account ID
The Private API key will display when it is first generated, but will be hidden from there forward. If you forgot to write it down, you can always use the 'Regenerate key' button to create a new one, but this will reset all of the fields, so discard your old data and only keep the new.
The next step is to create a mailing group. Select the sub-account you want to work with from the drop down menu at the top of the screen, then select the 'Audience' heading. This will display a list of all mailing groups currently associated with this sub-account.
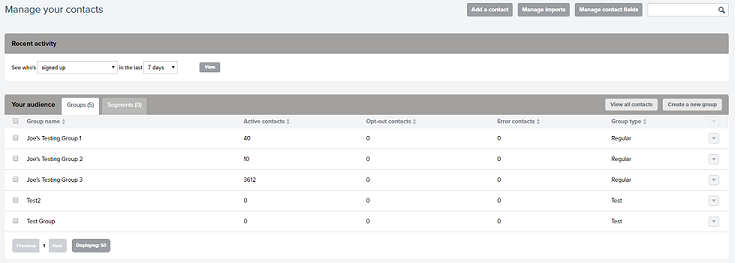
If you do not have a group already, or want a unique one for this e-blast, create a new group. Otherwise, simply make note of the options here. All of these groups will also show up inside the Conference Manager system. Please note that the upload from Conference Manager will not delete existing contacts from a mailing list. It will update existing contacts, but will not delete any others. Therefore, if you wish to reuse an existing mailing group, you may want to delete all of the contacts before proceeding with the upload.
Set-up Instructions - Conference Manager
Now that we have the myEmma side set up, it's time to turn our attention to Conference Manager. As mentioned above, if you don't see the tool, please contact support@confmanager.com to ensure that a) the tool is provisioned to your CID, and b) that you have sufficient permissions to access it (i.e., you must be an administrator).
Once we're sure that the tool is provisioned and you have access to it, it is now time to enter in the 3 pieces of information we acquired from myEmma to use for the API key. This can be entered at the bottom of the page in the Edit Conference page (Tools -> Community -> Edit Conference).

An important note: the system has been organized so that in any given CID it will look first at the settings for the CID you are in. If there are no data present in this CID, it will instead look to the parent CID for these values. This enables us to do 2 things. First, it means that you can set the API key values at the parent CID level and all of its children CID's will inherit the values. Secondly, if for some reason you want to use a separate myEmma sub-account within a community (i.e., a child CID using a different sub-account than its parent CID), you can do so by entering the usual API key in the parent CID, and a separate, more specific API key at the child CID level.
Now we can navigate to the tool itself (TID=140), by going Tools -> Community -> myEmma Upload
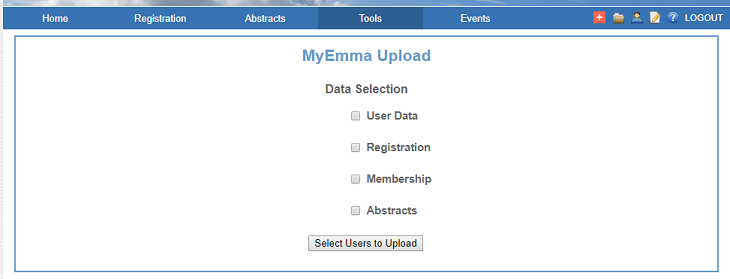
You are presented with 4 sets of options to choose from to make your selection. You may choose between either selecting 'All Communities' (which will select all child CID's) or selecting a specific CID.
1. User Data - you may select users based on their role (e.g., all reviewers, all administrators). Each specific CID will list the roles present in that community, whereas the All Communities option will include every role to be found across all communities
2. Registration - here you may select users based on their registration/delegate type. Again, the All Communities option includes all delegate types listed throughout all of the communities. Cancelled registration/delegate types do not appear with the others, but instead appear in their own 'Cancelled Delegate Types' section. Please note that this only includes the primary registrant on each registration, not co-registrants, accompanying people, or children (as separate email addresses are not always collected for them).
3. Membership - as each community will only contain a single instance of the membership tool (i.e., 1 membership per association), we do not display all of the communities like in the other choices. Instead, you may select users based on their membership status. You can select 'All Members', 'Current Members' (i.e., excludes expired members), 'Expired Members', or you may specify a date range of membership expirations. The date range can identify both active and expired members, so be careful what range you enter. Please note that you cannot select multiple headings (e.g., expired + a date range); instead enter a date range to capture your desired group.
You may also select members based on their Member Type (e.g., Full Member, Student Member). There is also a 'Cancelled Member Types' section to help separate old, grandfathered-in types.
4. Abstracts - you may also select users based on abstracts which they have submitted. You may choose either All Communities or a specific CID. You can further separate users by the acceptance status of their abstracts. 'All Abstracts' includes both accepted and unaccepted abstract authors, whereas 'Accepted Abstracts' does not contain unaccepted abstracts. On an individual CID level, you may also select users based on the keywords and categories associated with their submissions. There is a separate heading for Cancelled Keywords. Please note that only primary authors/submitters are selected, not secondary authors. Like Registration, we don't always collect this information, so only the first author is mailed.
Once you have chosen your selection criteria, click on the 'Select Users to Upload' button. This will cause the screen to refresh and display the message 'Data Ready for Upload'. You will be informed of the number of users selected by your criteria, and the myEmma Groups corresponding to your sub-account will appear.
Simply select the group/s you want to upload the user list to and click 'Upload'. If successful, a message will appear at the top of the form informing you that this is so, and will provide an Import ID number for you. Keep this number, as if there is an issue on the myEmma platform this number will help you restore your lost mailing list.

You can now refresh your myEmma page to see the updated number of Active Contacts. As mentioned above, we do not delete existing contacts that were present before the upload. We simply add the new contacts and update existing ones. You are now set to use the myEmma system with your new or revised contacts list/s.
A couple final important points:
1. If any duplicate users are detected while the list is being generated (e.g., an author submitted multiple abstracts, or a user had two active registrations in different child CID's) they are removed. We only sent a list of unique contacts to myEmma, so users should not receive multiple emails.
2. In myEmma, you can quickly see what mailing lists a given contact is in by delving deeper in to one of your mailing lists. Simply click on the mailing list, find the user in question, then click on their name. This will take you to a 'View contact' page which includes their information (first name, last name, affiliation, and email address) and what other Groups they are listed in. These may be adjusted from this screen.
